Thursday, September 27, 2012

I’ve Got My Fabric Love

Hello, everyone! Sorry for the long absence... I am back with this beautiful fabric to show you today.


If you are Elliott Berman Textiles fan on Facebook, perhaps you have noticed that they do Fabriclove Contest time to time. They post a question on Facebook and whoever gives a correct answer first will win the prize. It is such a fun! Earlier in September I was super lucky to win and they actually sent me a reward – a couple of yards of Missoni fabric! Take a look at this:


Lovely, isn’t it?

It is loosely-woven fabric with flower motifs in lovely shade of wisteria, cherry blossom, and cream. I am thinking to make a simple dress and pair it with a white trench coat.

Now off to check out all the blogs that I had missed in the last couple of months. See you later!

Wednesday, July 25, 2012

Floral Jacquard Dress Revisited

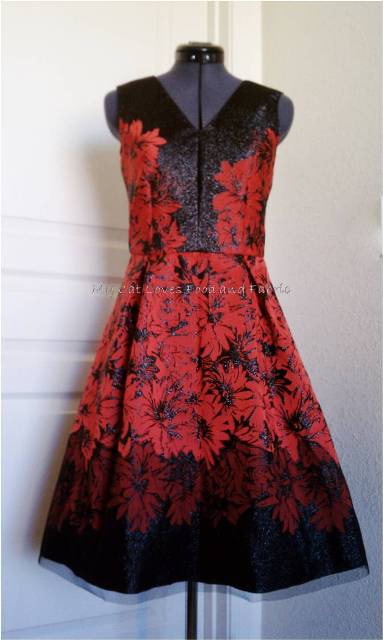
One of my favorite past projects is Carolina Herrera inspired dress (blogged here). I enjoyed every second of the project: buying the fabric, analyzing the details, adapting the patterns, making the muslins, and assembling the dress.


When I posted the picture of this dress on a sewing forum, Stitcher's guild, under the title: McCall"s 5466 + Vogue 8555 Dress, Kathryn of I Made This! said - "The way you added the netting at the hem area of the red/black dress for a faux ombré look is pure genius. "

Did she say ombré look?

I have to admit that I had never noticed that the netting gave the dress an ombré look. All my attention was given to the details like where the seams were, how the prints were oriented, etc. I was not seeing the forest for the trees, wasn't I? Well, that was my Aha! moment. (Thanks, Kathryn!)

So I told myself: When it comes to analyzing the design, looking at it from a distance is as important as examining the details.

Since I never had a chance to look at the original CH dress, I could only imagine how the netting was applied. Having said that, here is what I did for my dress: I basted the netting to the hem of the dress, sewed it using tiny zigzag stitches along the flower design, and cut the netting above the stitching line.


Adding the netting or sheer to the border-print fabric to create ombré look is indeed a brilliant idea. I cannot wait to use this technique -which I would have never known if I did not knock off CH dress - in the future. 


Parting shots: Sleeping kitties - don't we love cat's funny sleeping position? :)

Leo sleeping on the ironing board, using the fabric origami iris (blogged here) as his pillow.


Chester likes to sleep right in front of me when I study. I have been studying for the coming actuarial exam since my last post: Philosophy di Alberta Ferretti inspired coat has zero progress because of that...


Baby Leo :)


Until next time, cheers to you all!

Tuesday, July 17, 2012

Making Origami Iris

As I promised yesterday I would like to share how I made the origami iris. I had never made fabric origami before so there may be a better way to do this, yet I believe sharing is a good thing. :) Therefore this is a record of how I did it rather than a tutorial.


1. You need a square cut of fabric. The side of the fabric shown is 24.5"/62cm. It makes a big iris (16.5"/42cm wide).
2. Fold wrong side together to make a triangle.
3. Fold it again. 
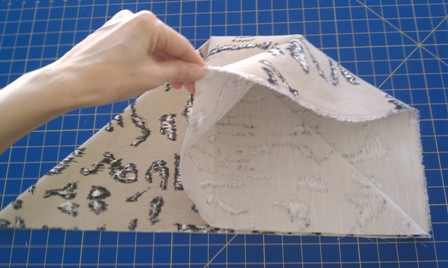
4. Rotate the triangle so that the long side faces toward you. Lift the top layer at the center point of the long side. Open it out and make a square.
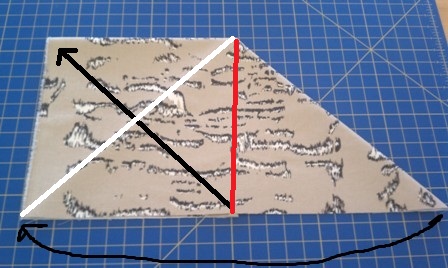
*Red line indicates upside-down V-shape fold which is called mountain fold.


6. Repeat step 5 on the other side. 
*White line indicates V-shape fold which is called valley fold.

7. Open out a square and make a diamond shape. Repeat on the other side.


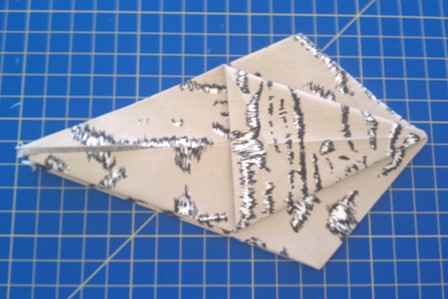
8. Fold the right flap to the left to reveal the smaller triangle. Repeat on the other side.


9. Open out one flap.

10. Reach inside the 'pouch' and pull it out. Repeat on the other side.


11. Fold the top flap down so that the smooth surface shows. Fold the top and bottom corners of the diamond as shown. Note that the left corner is open and the right corner is closed.


12. You are almost done! You need to secure some points before open up the petals. Hand sew where two folded corners meet with thread. 
13. Sew the side.
14. Sew all through the fabric near the center.
15. Now open the petals to make it bloom!

For the best result you may want to support the fabric (even the canvas fabric seems somewhat wimpy to hold its shape) by interfacing, starch, etc. and press as you go.  


Until next time, cheers to you all!

Monday, July 16, 2012

Fabric Origami Iris

After reading Rhonda's Monday Morning Inspiration today, I had an urge to make an origami iris just like John Galliano did for Dior in 2007. Seeing the iris must have unlocked memories from my childhood; many details of my preschool classroom in Japan suddenly flashed back. (It was like the movie Amelie.) I felt like I was four years old once again, making origami with my friends and two young female teachers in the yellow-themed classroom. Wow.

Here is Dior's iris:
Source: style.com
 This is what I made:

I used the cotton canvas from my 'what-was-I-thinking' stash for this experiment. Yes, it turned out quite big :) but I was happy that I still remembered how to make an iris. I will post its process next time.
*UPDATE: You can read about how I made the iris here.

Until then, cheers to you all!