Showing posts with label Milly Fabric. Show all posts

Sunday, March 16, 2014

More on McCall's 6506 Shirtdress

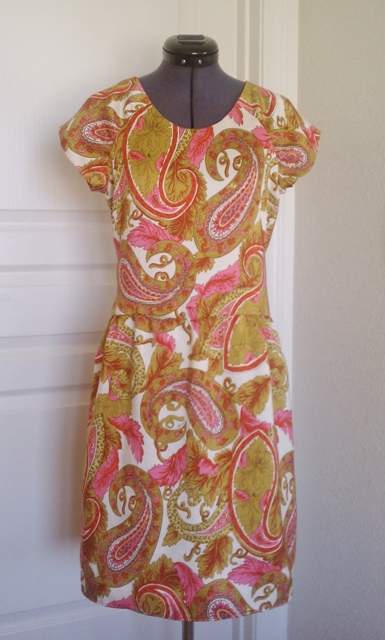
I had a lovely lunch with my friend yesterday and she took this photo of me. It was meant to be posted on FB to show how happy I was to receive a signed picture of my favorite soccer player, but I thought I should post it here as well. Although it is not front/back photo, it still may help some readers to visualize how the dress looks on a petite figure. I am 5'2/157cm and wear US size petite 0/XS. I cut pattern size 8 and shortened the bodice.

Shirtdress


Some random thoughts after wearing McCall's 6506 shirtdress:


The dress is comfortable to wear even though the fabric has no stretch to it. If you have a thick back, I recommend that you make a muslin to test.

Waist is marked on the skirt pattern. This means that the belt is supposed to be slightly above waist, but mine sits at waist. I probably should have shortened bodice additional 1/2 inch or so. However, I think tying the belt at waist is more comfortable than doing so at above waist.

The waist darts are supposed to be folded outside. I folded inside because I did not care for outside darts. This change did not affect the fit at all.

Skirt hits at knee. If any shorter this print may look a bit childish for 40-something woman. I may shorten the skirt if I use more mature fabric.

On pattern envelope the collar looks too big for my taste. I cut off its long edge about an inch. Even after that I still feel the collar is big and dress looks little too 70's. Now I see why. I had to alter the shape of the collar, not just trimming around the long edge. I like this collar on Oscar de la Renta:

Photo courtesy of www.Nordstrom.com
Oscar de la Renta Lace Print Shirtdress

Be warned: The skirt is easily blown up by the wind!

Overall, I like this pattern. It is great addition to casual daytime wardrobe.

Until next time, happy sewing everyone!

Wednesday, March 12, 2014

McCall's 6506 Plenty by Tracy Reese Shirtdress

I had some time to sew last weekend at last! Did I try to finish Vogue 8857 tunic that I started last fall and abandoned since then? Nope! I made this dress.


Shirtdress
McCall's 6506 Front

Shirtdress
McCall's 6506 Back

Fabric: Cotton Poplin from Gorgeous Fabrics (I used same print before: Vogue 1177 Poppy Blouse)
Pattern: McCall's 6506 - Out of Print (Limited sizes are still available at McCall's website as of 03/12/2014)
Some Changes: 
  • Collar: Since I thought that collar looked too big on the pattern envelope, I made it smaller.  
  • Pockets: I wanted to make pockets and actually cut them out, but the instruction for attaching them confused me so much that I decided to omit them. I thought that either the illustration was wrong or cutting line and fold line on pattern were mixed up. Of course I could be wrong...

The dress has a retro vibe to it. I like how pleats turned out. 


I tried Hong Kong finish for the first time. I am loving the result!

Hong Kong Finish

  By the way, this dress sold at Nordstrom looks identical to McCall's 6506.

Photo Courtesy of Nordstrom.com
Plenty by Tracy Reese 'Amy' Print Shirtdress

Now I want a black belt to wear with my new dress! 

Shirtdress

Happy sewing everyone!


Tuesday, June 26, 2012

Vogue 1177 Poppy Blouse

Vogue 1177 Blouse Front

Vogue 1177 Blouse Back

Fabric: Printed voile from Gorgeous Fabrics
Pattern: Vogue 1177

Vogue 1177 Line Drawing

I used upper parts to make a blouse.

As I mentioned in my previous post, this pattern involves tuck and pleat details.

Vogue 1177 Front Detail

I shortened the sleeves and added fringe around the ends of the sleeves.

Vogue 1177 Sleeve Detail

In addition to the pleats detail, I really like side panels. It adds dimention to the side view of the blouse.

Vogue 1177 Side Panel

Meanwhile there was a moment I had to pause...

Since the fabric was very loosely woven I knew I needed to finish raw edges, but look at what Vogue Patterns had to say about finishing edges:


… and I do not own a serger (yet). Duh!

There was a simple solution though; I used hand overcasting to finish all the visible raw edges. It was a very easy process and did not take too long to finish all the edges.

Vogue 1177 Hand Overcasting

This blouse is a good match with the Vogue 1247 black skirt.

Vogue 1177 Blouse + Vogue 1247 Skirt

It can also be tucked into the skirt.


This look reminds me of Nanette Lepore's Circus Lovin' skirt.

Source: Neiman Marcus

Despite making all of the tedious pleats, I was very impressed by how effective each detail works together. I am looking forward to trying other Anna Sui patterns in the future.


Until next time, cheers to you all!

Thursday, June 21, 2012

Vogue 1177 Pleats Please

No, I am not talking about Issey Miyake's collection. It is more like "Oh gosh, Vogue 1177, how many pleats do you want me to make? Please someone do it for me..."

Vogue 1177
Source: Vogue Patterns

There are pleats and tucks to make in Vogue 1177. I began with making five tucks in each front yoke. It went well. My next task was making seven pleats in each front piece. Then fourteen in back. Then more in sleeves, which I had not even marked yet... If you are good at making pristine pleats, Vogue 1177 will be great for you to showcase your skill.


The above picture shows the yoke front after the tucks were made. I was happy with the result until I realized that I pressed the tucks in wrong direction...

So I re-pressed. Oh well, those unfortunate chopped ends of the tucks should be hidden under the neck binding.


Then the next unfortunate thing happened when I tried to join yoke and upper front. The length of each piece did not match. I had to redo the pleats on both right and left pieces. Luckily the back pieces had no problem. It is possible that I might have made the tucks bit wider or the tucks were marked wider than they should be on the pattern.     


After joining yoke, upper front, and upper side front, it looks like this:


Back piece inside view:


Guess what? All the tedious works were rewarded when the front and the back pieces joined together. I immediately fell in love with this unfinished top!


My plan was to make a blouse from this pattern. Now that I love how it looks wihout sleeves, I have to make a decision: Long sleeve, short sleeve, or no sleeve? Hmmm. 

Vogue 1177
Source: Vogue Patterns

Well, that is all for today. I am hoping to show you the finished blouse next time. 

Until then, cheers to you all!

Tuesday, May 22, 2012

Vogue 8684 Paisley Dress - Completed

I finished my dress today! Vogue 8684 is a simple pattern and easy to put together. The dress is very comfortable to wear.

The fabric was just so lovely to work with. This was my first time working with silk shantung and I found it much easier to handle than silk charmeuse or chiffon. Only difficulty I had with this fabric was a pattern placement. I decided not to match the print, however, the paisley motifs at the waist and the skirt on the right in the picture almost match unintentionally! It looks like I tried to match the matif and failed it! Well, except that, I love what I made.

You can read pattern and fabric detail here.


Inside view:


What did I do after finishing this dress? I ate doughnuts! Rhonda from Rhonda's Creative Life posted this wonderful recipe on her blog recently. I knew I was going to try it because I love simple cake doughnuts. It was easy to make and  fun to watch every doughnut puffed up really good. The sweetness was just right for me. You can find her recipe here.


Until next time, cheers to you all!

Sunday, May 20, 2012

Vogue 8684 Paisley Dress

Since I have tremendous amount of fabric love, a starting point of my sewing project is often a fabric rather than a purpose. This project is no exception. The fabric is silk shantung from Elliott Berman Textiles. I bought two yards of this beautiful paisley silk few seasons ago.

Draped over the dress form

Pattern: Vogue 8684
I have been wanting to try this pattern because of the diagonal darts in the front bodice and the raglan sleeve. I thought it could be a charming day dress.

Vogue 8684

Pre-muslin Alteraion:

1. The length of the bodice was shortened by 1".

2. The center-back cutting line was redrawn straight. This is a must alteration for my thin back. Without this alteration I always have an air porket in the upper back regardless of which company's pattern I choose.

Back adjustment
3. Two pieces of sleeve pattern were merged into one piece. It is just my personal preference.

4. Misprinted circles on the bodice front piece were corrected. The small circle should be 3/8" away  from the cutting line yet it is printed 5/8" away. I moved both circles to the correct places.

Correcting the misprinted dots

I made a muslin out of $1/yard fabric from Walmart. The picture was taken after lowering the neckline.

Vogue 8684 muslin

Post-muslin alteration:

1. The neckline was too high for me. I made it 1" lower in the center front. This change made the neckline look more like a pattern envelope picture.

Lowering the neckline

2. I chose not to alter the skirt length. It hits my knee at the perfect place. This also means that the skirt will be short for the tall ladies. (I am 158cm/5'2" tall.)

3. I added lining. This was easily done by joining both fabric and lining together at the neck opening.

Adding the lining

Understitching

The bodice after adding the lining
The dress could be done last night but it did not happen due to an emergency - well, it was a very happy emergency. My friend called me just after midnight and told me that her water broke! I drove to her house in my PJ to babysit her two-year-old daughter. After eight hours later, she gave a birth to a beautiful boy! How exciting!!!

You will see my next post with pictures of my completed dress pretty soon since I only need to hem up the sleeve to finish it.

Until then, cheers to you all!

Tuesday, April 10, 2012

On my Sewing Table: Vogue 1177

Hello, everyone! It has been a while since my last post. Here is an update on what I have been up to. I have been working on Vogue 1177 Anna Sui dress. So far I cut all the pattern pieces and did my usual petite alteration.

Vogue 1177 Anna Sui Dress

Meanwhile this Milly poppy print voile was washed and ready to be cut.


Since I have been very busy keeping up with my school work, I can not spare even thirty minutes sewing time a day these days... The pattern pieces have been sitting on the table for days. It is not a good sight. Obviously somebody thought something had to be done. Yesterday I caught Leo studying the instruction!

It's so easy, a kitty can do it!

Was he trying to sew for his mommy?! Maybe:D Since this kitty scoops water with his paw from his water bowl to drink, my instruction sheets have some water marks now. He definitely should not work on silks.

I hope I can sew sometime soon. Until then, cheers to you all!

UPDATE: You can read Vogue 1177 in progress here: Vogue 1177 Pleats Please

Friday, March 23, 2012

Vogue 8182 + Vogue 1086 Part III - It's All Done!


I finished my Milly inspired dress today. :)

Front
Back

The inspiration for this project was this Delia dress by Milly.

Milly Delia Dress from nordstrom.com

Pattern: Vogue 8182 and Vogue 1086
(For pattern usage detail, click here to go to my previous post.)

If you follow Vogue 8182's instruction, you will end up with exposed zipper tape inside the dress. I did not like it when I made this pattern before, so this time I covered the zipper tape under the lining instead. To do so, I left lining unstitched about two inches from the left side, attached the zipper (kept lining free), then hand-sewed the lining to the zipper tape.  

Zipper Opening
Inside View of Zipper Opening


Fabric: Printed silk from Gorgeous Fabrics. It looks like this fabric has an intermixed design of paint splatters and plants in vibrant colors. It is light weight and has a fluid drape. It leaves a stitch mark so make sure you know what you are doing when you sew this fabric.

Stitch mark

By the way, I have been trying a new (to me) approach to sewing this week and it worked great. It is simple. I sew just a little bit in the morning for about 30 minutes before I start a regular busy day. I was surprised to find that knowing my project is progressing (even if it is a teeny tiny little step) has a positive impact on my mind throughout the day. I love it!

Sewing in the morning sunlight
Until next time, cheers to you all!