Wednesday, December 19, 2012

Adding Length to a Ruffle Dress


J.Crew Rosalie Twisted Dress

Last week, I bought J.Crew Rosalie dress for my daughter to wear to her Christmas concert. It is a charming dress with alternating cotton knit and silk ruffles.


She is between size 12 and 14 right now. Since size 14 in red was sold out, I ordered size 12. It arrived the night before the concert. Sadly it was too short for her. It hit her mid thigh; There was no way she could wear it to her concert as she had to be seated to play the flute. But we did not find anything good - anything at all - in local stores this year... What to do?


That was when my stash came to the rescue! I had red china silk which was almost a perfect match. 


First off, I examined the dress; I immediately noticed that all ruffle edges were unfinished. I liked it because I knew it would make my job easier.


I decided to add two 3.5"-width ruffles. Here is how I drew the ruffle pattern. It may not be a proper way of drafting, but hey, it worked! By the way, by skirt hem length I meant the length of the hem of one side of skirt.  


I knew my daughter had a compass somewhere in her room but I could not find it. :( So I wrapped a ribbon around the pencil and taped it. Ta-da! An instant compass! I cut out one circle out of tissue paper and taped it to the dress as a test.


Leo approved!


I rounded the edges of the ruffle pattern. Then I cut two ruffles out of china silk and attached them to the hem, overlapping each edge. I hand-sewed so that it would be easier to remove the ruffles before I donate the dress in the future.  

On the side note, ironing this dress drove me crazy! If you have to iron this dress, I suggest using steam on silk setting and hovering the iron just above the fabric.  
Adding length to the dress by attaching ruffles was a success! My daughter could wear it to the concert last night. I must say she was very pretty in this dress and played the flute so beautifully.

Tuesday, November 20, 2012

Pumpkin Sweet Potato Bread

If you like pumpkin bread, you probably like this bread as well! This recipe makes 3 regular (7 X 3 inch) loaves or 9 mini loaves. Right now I am baking 2 regular and 3 mini loaves for my school club’s bake sale. I love the yummy smell of bread baking in my oven!


Makes 3 regular (7 x 3 inch) loaves

Wet Ingredients plus Sugar

1 1/2 cup butter, melted and cooled in a large pan

1 1/2 cup sugar

1/4 cup maple syrup

1 (15 oz) can pumpkin puree

1 (15 oz) can sweet potato, drained, mashed, and pressed through a fine sieve*

6 eggs

Dry Ingredients

4 cups all-purpose flour

2 tsp baking soda

½ tsp baking powder

1 tsp cinnamon

1 tsp nutmeg

1 1/2 tsp sea salt, grounded**

½ tsp clove, grounded**


*You can skip pressing process if you do not mind tough fibers of sweet potatoes.

**I grounded sea salt and clove in mortar and pestle just because I did not have regular salt and clove powder.

Direction

1. Preheat oven to 325F.

2. Combine all the wet ingredients and sugar in a large pan. Mix well.


3. In a very large bowl, combine all the dry ingredients. Shift, if desired.

4. Combine wet and dry ingredients mixture. Mix until just blended.


5. Pour into the pans (you do not need to grease them). Bake 40 -60 min (mini loaf) / 50 – 70 min (regular loaf) or until a toothpick inserted in the center comes out clean.


A slice of this bread with a fresh cup of coffee on a chilly morning is lovely. Enjoy. :)


Thursday, September 27, 2012

I’ve Got My Fabric Love

Hello, everyone! Sorry for the long absence... I am back with this beautiful fabric to show you today.


If you are Elliott Berman Textiles fan on Facebook, perhaps you have noticed that they do Fabriclove Contest time to time. They post a question on Facebook and whoever gives a correct answer first will win the prize. It is such a fun! Earlier in September I was super lucky to win and they actually sent me a reward – a couple of yards of Missoni fabric! Take a look at this:


Lovely, isn’t it?

It is loosely-woven fabric with flower motifs in lovely shade of wisteria, cherry blossom, and cream. I am thinking to make a simple dress and pair it with a white trench coat.

Now off to check out all the blogs that I had missed in the last couple of months. See you later!

Wednesday, July 25, 2012

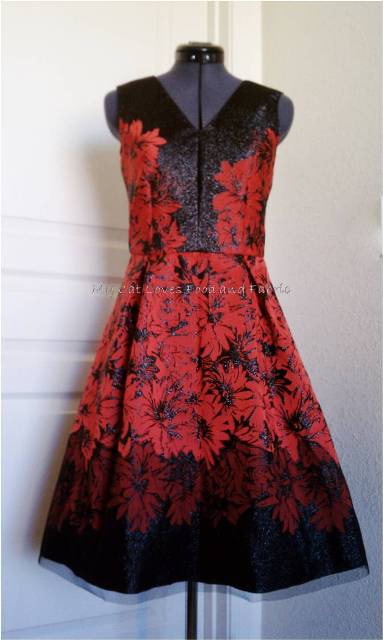
Floral Jacquard Dress Revisited

One of my favorite past projects is Carolina Herrera inspired dress (blogged here). I enjoyed every second of the project: buying the fabric, analyzing the details, adapting the patterns, making the muslins, and assembling the dress.


When I posted the picture of this dress on a sewing forum, Stitcher's guild, under the title: McCall"s 5466 + Vogue 8555 Dress, Kathryn of I Made This! said - "The way you added the netting at the hem area of the red/black dress for a faux ombré look is pure genius. "

Did she say ombré look?

I have to admit that I had never noticed that the netting gave the dress an ombré look. All my attention was given to the details like where the seams were, how the prints were oriented, etc. I was not seeing the forest for the trees, wasn't I? Well, that was my Aha! moment. (Thanks, Kathryn!)

So I told myself: When it comes to analyzing the design, looking at it from a distance is as important as examining the details.

Since I never had a chance to look at the original CH dress, I could only imagine how the netting was applied. Having said that, here is what I did for my dress: I basted the netting to the hem of the dress, sewed it using tiny zigzag stitches along the flower design, and cut the netting above the stitching line.


Adding the netting or sheer to the border-print fabric to create ombré look is indeed a brilliant idea. I cannot wait to use this technique -which I would have never known if I did not knock off CH dress - in the future. 


Parting shots: Sleeping kitties - don't we love cat's funny sleeping position? :)

Leo sleeping on the ironing board, using the fabric origami iris (blogged here) as his pillow.


Chester likes to sleep right in front of me when I study. I have been studying for the coming actuarial exam since my last post: Philosophy di Alberta Ferretti inspired coat has zero progress because of that...


Baby Leo :)


Until next time, cheers to you all!