Tuesday, May 29, 2012

Vogue 1247 Skirt Length


I have been working on Vogue 1247 skirt.


The skirt length is 15" for all sizes. How short is that? Take a look at the skirt currently sold at saks.com. Note that the model shown is 5'10" (177cm) wearing US size 4.
Source: Saks Fifth Avenue

Source: Saks Fifth Avenue

Here is the product description quoted from Saks' website:

"Rachel Comey Oyster Bar Mini Skirt
 Angled stripes converge on this high-waisted mini crafted from lightweight linen.
  • High waistband
  • Front slit pockets
  • Side zipper
  • About 15  3/4" long
  • Linen
  • Dry clean
  • Made in USA of imported fabric
$391.00 "

...
So, the Saks version is 3/4" longer than the Vogue 1247.

Now here is Vogue 1247 muslin on me who is 8" shorter than the model. I added 2" to the length and the skirt in the picture was not hemmed. The hem is 2" i.e. what you are seeing in the picture is 19" skirt in pattern size 6 on 5'2" person.


I joined two back pieces into one to simplify the construction.

I was happy with the fit and liked the length of unhemmed skirt. I decided to add 4" to the original pattern, however, if you are in 20's in real age or at heart and have legs to show off, go for 15" length!

By the end of the day, I cut three skirts in orange, white, and black. You can see that I have a good feeling about this skirt pattern already. The pattern instructs you to do Hong Kong finish on all the visible seam allowance, which is really nice, but I am going to line the skirt instead.


Guess what? I cut two more sets! One is Vogue 1247 top which I said I did not want to make again. The top I made (click here to go to the post) was super comfortable to wear, I decided to give it one more chance. Again, it is slippery silk charmeuse, but this time it is much thinner. I also managed to cut Vogue 1177 Anna Sui Dress. This one will take long time... There were so many details on Vogue 1177, I did not finish marking.


Orange skirt is already done! I will post the detail next time. Until then, cheers to you all!

Friday, May 25, 2012

Vogue 1247 Rachel Comey Top


Here is my test version of Vogue 1247 Rachel Comey top, shown with orange double knit fabric pinned to the dress form. This is a very loose-fitting top that you may not need to make a muslin if you can take a deep neckline. I wanted to test it because I narrowed the neck opening and raised V by 1 1/2" at the center. I also shortened the length by 1".

The fabric is silk charmeuse which I bought from Denver Fabrics so many years ago. I only had little less than 1 1/3 yard in 45" width of fabric so there was not enough to cut bias sleeve facing.

Vogue 1247


Source: voguepatterns.mccall.com

I had a false impression on the difficulty level of this pattern. After reading many reviews it looked to me that people made this pattern easily and quickly. Turned out it was not so easy for me.

One of the interesting design feature of this top is the lower front where four pieces of fabric joined together. Because of the french seams, the point where all the pieces met became very bulky. Sewing bulky seams on slippery fabric was not so much fun.

One more piece to add to this bulk...

All four pieces are joined
Joining the upper front pieces together at the center front was also a little problem. It was bulky where the neck facings met together. Precise marking and sewing are required in this step because two points - neck line and darts -must match at the center.


Lastly, making narrow hem on curved hemline on slippery fabric was not so easy...

Anyway, the top is done. 


I recommend using thin fabric for this top pattern. I thought my charmeuse was not thick at all, but it became bulky at some places. It will be helpful if the fabric is easy to press since you are going to press a lot to make french seams. Of course another option is not doing french seams and just serge/zigzag seam allowance.

Conclusion: I think the top is cute and great style for hot summer days. I do not want to sew it again, however, I will probably make a skirt using this pattern in the future.


By the way, Leo was taking a nap in the suitcase the other day. Cuteness! 
 

Until next time, cheers to you all!


Tuesday, May 22, 2012

Vogue 8684 Paisley Dress - Completed

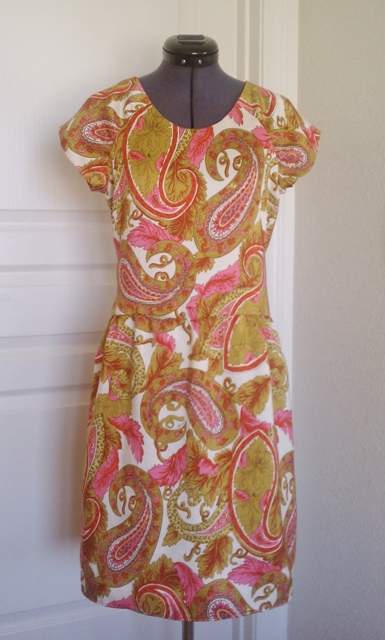
I finished my dress today! Vogue 8684 is a simple pattern and easy to put together. The dress is very comfortable to wear.

The fabric was just so lovely to work with. This was my first time working with silk shantung and I found it much easier to handle than silk charmeuse or chiffon. Only difficulty I had with this fabric was a pattern placement. I decided not to match the print, however, the paisley motifs at the waist and the skirt on the right in the picture almost match unintentionally! It looks like I tried to match the matif and failed it! Well, except that, I love what I made.

You can read pattern and fabric detail here.


Inside view:


What did I do after finishing this dress? I ate doughnuts! Rhonda from Rhonda's Creative Life posted this wonderful recipe on her blog recently. I knew I was going to try it because I love simple cake doughnuts. It was easy to make and  fun to watch every doughnut puffed up really good. The sweetness was just right for me. You can find her recipe here.


Until next time, cheers to you all!

Sunday, May 20, 2012

Vogue 8684 Paisley Dress

Since I have tremendous amount of fabric love, a starting point of my sewing project is often a fabric rather than a purpose. This project is no exception. The fabric is silk shantung from Elliott Berman Textiles. I bought two yards of this beautiful paisley silk few seasons ago.

Draped over the dress form

Pattern: Vogue 8684
I have been wanting to try this pattern because of the diagonal darts in the front bodice and the raglan sleeve. I thought it could be a charming day dress.

Vogue 8684

Pre-muslin Alteraion:

1. The length of the bodice was shortened by 1".

2. The center-back cutting line was redrawn straight. This is a must alteration for my thin back. Without this alteration I always have an air porket in the upper back regardless of which company's pattern I choose.

Back adjustment
3. Two pieces of sleeve pattern were merged into one piece. It is just my personal preference.

4. Misprinted circles on the bodice front piece were corrected. The small circle should be 3/8" away  from the cutting line yet it is printed 5/8" away. I moved both circles to the correct places.

Correcting the misprinted dots

I made a muslin out of $1/yard fabric from Walmart. The picture was taken after lowering the neckline.

Vogue 8684 muslin

Post-muslin alteration:

1. The neckline was too high for me. I made it 1" lower in the center front. This change made the neckline look more like a pattern envelope picture.

Lowering the neckline

2. I chose not to alter the skirt length. It hits my knee at the perfect place. This also means that the skirt will be short for the tall ladies. (I am 158cm/5'2" tall.)

3. I added lining. This was easily done by joining both fabric and lining together at the neck opening.

Adding the lining

Understitching

The bodice after adding the lining
The dress could be done last night but it did not happen due to an emergency - well, it was a very happy emergency. My friend called me just after midnight and told me that her water broke! I drove to her house in my PJ to babysit her two-year-old daughter. After eight hours later, she gave a birth to a beautiful boy! How exciting!!!

You will see my next post with pictures of my completed dress pretty soon since I only need to hem up the sleeve to finish it.

Until then, cheers to you all!