Tuesday, December 10, 2013

Mini Salmon and Asparagus Quiche


I love the versatility of mini phyllo shells. I used salmon and asparagus for these mini quiche but you can substitute with so many other ingredients. While these are great appetizer to pair with wine or beer, one of my friends likes them on brown rice with a bit of soy sauce.


Ingredients:

1 Package (15) Mini Phyllo Shells

1 Large Egg
1/8 Cup Heavy Cream
Salt
Nutmeg
Black pepper

1 Fillet of Salmon, cooked (I grilled it) and crumbled
Thin Asparagus, cut into 1" piece then boiled for about a minute
*Maybe you do not need to precook asparagus as it can be cooked during the baking process.

Need 24-cup Mini Muffin Pan

Direction:

1. Preheat the oven to 375 F.

2. In a small bowl, combine egg and cream. Season with salt, nutmeg, and pepper. Set aside.

3. Place the phyllo shells in the muffin tins. Place salmon and asparagus in each shell.

4. Spoon the egg mixture into phyllo shells.

5. Bake for 12 - 14 minutes.


* * * * *

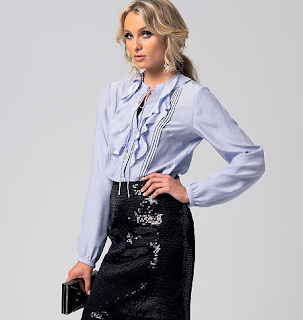
Vogue 8857 Sewing Update: So far I have finished bodice and sleeves (Did I hear 'that's it?'). Yet another exam (this time SQL) coming next month, my next update would be most likely after that.

Wishing everyone a very happy holiday season!


Thursday, October 31, 2013

A Cat Who is Not a BIg Fan of Halloween


How dare you, mommy!
 
 
Just so you know, I did not make his costume. It was meant for a small dog.
 
 
Happy Halloween! 

Monday, October 7, 2013

Vogue 8857 Part 1 - Flounce

How is everyone? Here is a quick update on Vogue 8857 tunic.

Vogue 8857: Photo courtesy of Vogue Patterns

I am not making tucks for those details will most likely disappear in the busy print. So I started off with attaching flounce.

Each side has two rows of flounce. For flounce placement, be sure to mark on right side of front. (Of course, my placement line was on wrong side and this was not the first time I had done that.)

Flounce 2* was staystitched, clipped, and pinned to the front with right side together. (*Pattern Number)

 
After stitching flounce to front, you trim seam allowance, press the flounce and edgestitch close to the seam.


For flounce 3, you just have to baste at this time. Make sure you pin wrong side of flounce to right side of front.  


Though these flounces are somewhat lost in the print, they are pretty. I like how they look.

 
Well, that is all for today.

Happy sewing :)

Sunday, September 29, 2013

Hello Again

Today was a good day. Not just because it was a beautiful day in Tucson, Arizona, but I suddenly wanted to sew something and actually got started.

I don't know what caused this sudden change to myself. After all it was quite an ordinary morning: My cat, Chester woke me up by accidentally kneading my bare arm around 7AM (like every morning). I fed him and saw him leaving the room immediately after having exactly one bite (again, like every morning). Then I had a coffee and thought I wanted to make something today.

So I went through my stash and, because cotton is the easiest to handle, pulled some cotton cuts out. 


What happened next annoyed me: I could not decide what to make for a ridiculously long time. I just couldn't. This made me think of the scene from the documentary film about Anna Wintour: In that film, she described her strength as "decisiveness". Well, today it became perfectly clear why I was not an editor-in-chief of Vogue. (By the way, her self-claimed weakness was "children". So is mine! Does this make me an editor-in-chief? Sadly, no.)

Anyhow, I finally started cutting pattern pieces around 2PM, did some petite alteration, then cut the fabric. Here is what I have accomplished today. I apologize for the bad focus of my photo.


Oh, did I tell you that I am making Vogue 8857?

 Photo Courtesy of Vogue Patterns

I am glad that I am sewing again. Why I had not been sewing for a while was not due to illness or any serious matter. It was just that I was busy before graduation in May, got used not to sew, and kept on not sewing even after graduation (oh yes, I graduated! I am officially a math geek now). Honestly, I don't know why, but now that I am sewing again, I like to think that my creativity had been hibernating in the past months and finally awoke (in the fall, yes).

Happy sewing, everyone.

Wednesday, January 9, 2013

Orange Burst! Mini Baklava Cups


I wanted to make baklava for New Year's Eve party and came across this wonderful Baklava Cups recipe by Sunny Anderson on the Food Network's website. I liked the idea of using mini phyllo shells since making real baklava seems a little intimidating. I used orange instead of lemon and made syrup using hand-squeezed orange juice. Mini baklava cups are great for party as you can prepare them the day before. I like them warm with warm syrup drizzled over but they taste great even without syrup. 

This recipe makes 30 baklava cups

Ingredients:


For filling

½ cup pistachios
½ cup walnuts
½ cup almonds
1 orange zest
2 tbsp sugar
2 tbsp butter, melted
½ tsp cinnamon
¼ tsp salt
¼ tsp vanilla extract

For syrup

1/8 cup sugar
1/8 cup honey
Juice from the orange 
 

For shell

30 mini phyllo shells (2 packages)


*Need two 24-cup mini muffin pans

Direction:
1. Preheat the oven to 350F.
2. Melt the butter. Set aside.


 3. Roast the nuts for 10 minutes.


4. Zest the orange. Save the orange as we use its juice later.


5. Combine all the filling ingredients in the food processor. Pulse until blended.


6. Fill shells with 1 tbsp filling, gently press it down. Bake for 10 minutes.


7. To make thin syrup, combine 1/8 cup of sugar and honey in a small sauce pan. Cut the orange half or quarter and squeeze over sugar and honey. Add water if necessary. Mix it well and simmer for about 8 minutes.

8. Pour ½ tsp syrup into each baked cup. Refrigerate for at least 5 hours or overnight.

OR 

Serve warm with warm syrup drizzled over.


Enjoy!

Saturday, January 5, 2013

Butterick 5211 or Duras Dress


Fabric: Border-print silk charmeuse from Fabric Mart
Lining: China silk
Pattern: Butterick 5211


Butterick 5211

Changes I Made: I lowered front neckline, omitted facings and center back seam, and added lining.

Construction Note: This pattern is simple and easy. Only difficulty I had was making a narrow hem to finish the sleeve opening. I am not really proud of what I had done because I ended up with ripples. I see the same problem at the neck opening also. It looks like the war between me and slippery silk continues… hahaha.          

Inspiration:


When I saw this pattern I immediately thought of The Lover written by Marguerite Duras. It was specifically this part of the book.  Please allow me to quote in Japanese first because I was thinking in Japanese at that time.

「わたしはずっと長いあいだ、わたしだけの服というものをもっていない。わたしの服とは言ってみれば袋のようなもので、母の古い服の仕立て直しだが、その母の服というのもまあ袋のようなものだ。(中略)わたしはこういう服を、袋をかぶるみたいに着て、ベルトを締めてかたちを崩す、と、これでおきまりのわたしのスタイルとなる。」
愛人 マルグリット デュラス 著 清水 徹 訳

English translation of the same part:

 “For a long time I’ve had no dresses of my own. My dresses are all a sort of sack, made out of old dresses of my mother’s which themselves are all a sort of sack. … I wear these dresses as if they were sacks, with belts that take away their shape and make them timeless. 
The Lover, Marguerite Duras, Translated by Barbara Bray

Of course the original book is written in French. It is a shame that I do not own it…

More view of Duras dress
"Sack" version:

Side:

Back:

*   *   *   *   *   *
Now, I want to take a moment to say thank you again to Mrs. Mole of fit for a queen for the One Lovely Blog Award nomination! It is truly amazing that a talented person like her (just look at her blog!) thinks my blog is worth the award. (I am trying to pick ten bloggers to pass the awards but, oh boy, it is too difficult!)
I also want to say thank you to Rhonda of Rhonda’s Creative Life for featuring my blog. As many of you probably checked it already, her recent Wednesday Showcase is a wonderful collection of so many talents. If you are new to browsing sewing blogs it is definitely a good place to start.  

Last but not least, thank you to all my readers and blog friends; Thank you so much for visiting and following my blog, kindly leaving your comments, and sharing your world through your blog.

Wishing everyone a wonderful year ahead!   
Love,
Yuki